Password-Based Authentication
Users created using DCL are required to set a password that the system uses for authentication when connecting to the database. Administrators can use Database Password Security Settings to manage settings such as minimum password length and password expiration policies.Fully Qualified User Name (FQUN)
To connect to the database, you must provide an FQUN. For database users, the FQUN has this form.Text
alice, a member of the database example_database.
Text
How To Connect using Password Authentication
Set the FQUN in the connection string along with the password of the user. For example, this code is the commandalice uses to connect to example_database using the Ocient JDBC driver.
Text
- user —
alice@example_database - password — “
Single Sign On (SSO)
The Ocient System allows administrators to add a Single Sign-On integration, allowing users to authenticate using an external Identity Provider (idP). A database, including thesystem database, can have 0 or 1 SSO integrations.
The existence of an SSO integration has no effect on users who authenticate with the Password Authentication flow.
OpenID Connect
There are two flows that allow users to connect to the database using an external OpenID Connect Provider.Authorization Code Flow
This is the most commonly used authentication method and makes use of the OAuth 2.0 Authorization Code Grant. When you connect to the database, the Ocient driver directs you to the authorization endpoint of the OpenID Provider, where you log in with your SSO credentials. After the Provider authenticates you, it redirects you back to the database with a temporary code, which the database exchanges for an ID token, Access token, and optionally, a Refresh token. See this image for a sequence diagram of the flow.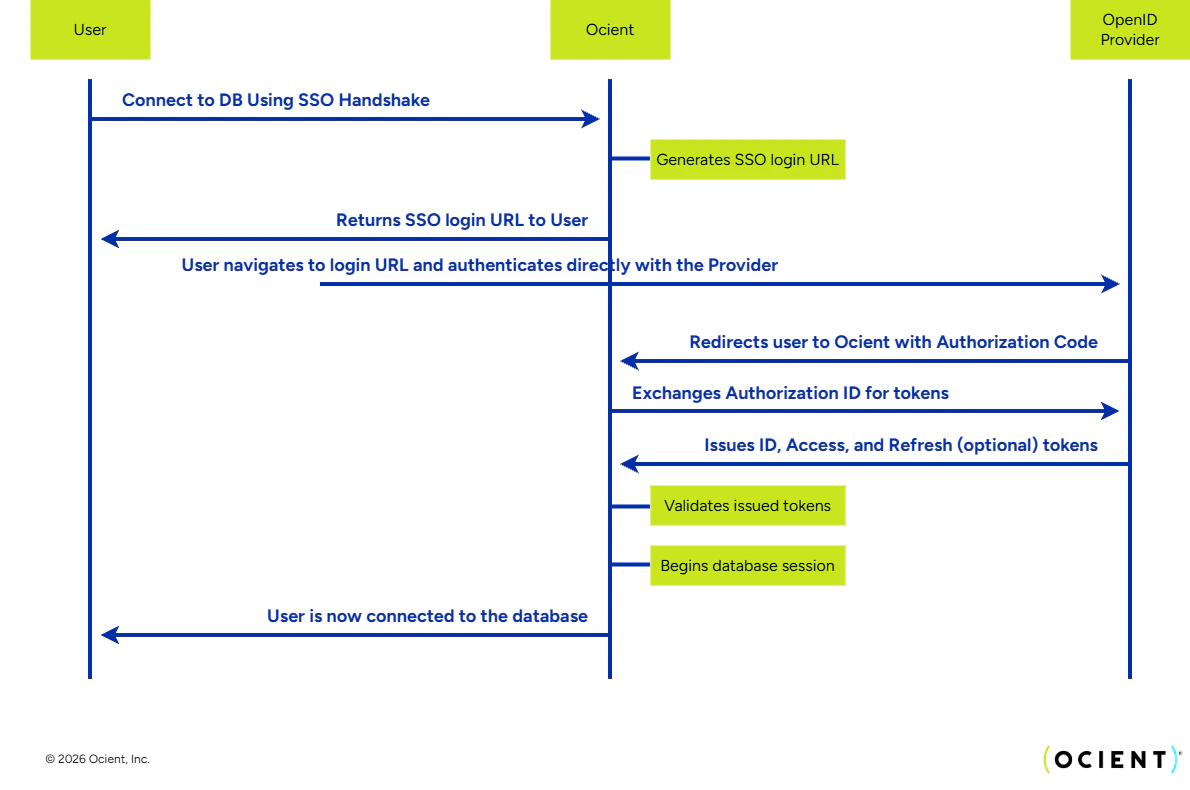
example_database database using the Ocient JDBC driver.
Text
- handshake —
SSO - user —
<empty_string> - password —
<empty_string>
The
user and password properties are required and must be set to the empty string.SSO Token Flow
Users can provide either an ID Token or an Access Token issued by the OpenID Provider to connect to the database. The provided ID or Access token must contain these claims:- iss — The issuer must match the issuer contained in the discovery document of the OpenID Provider.
- aud — The token audience must contain the
client_idused when configuring the OpenID Provider in the database.
Ocient recommends including the
email scope in any token provided to Ocient. The system uses the value of the email claim to identify the user in the database audit trails.Ocient supports these signing algorithms for ID Tokens:- RSA 256
- RSA 384
- RSA 512
- handshake —
SSO - user —
id_tokenoraccess_token - password —
<token_data>
example_database database using an ID Token.
Text
example_database database using an Access Token.
Text
Configure the OpenID Provider
Before users can authenticate using SSO, you must register the database with the OpenID Provider. This process varies depending on the provider, but typically, the steps for doing so are:- Create an application for the Ocient System in the Provider. Select the “Native Application” application type.
- Enable the Authorization Code, Refresh Token, and Device Authorization grant types.
- Grant permission to the appropriate users to use the newly created application.
- Enter this Redirect URI.
For the OpenAPI or UI application, the redirect URI must use
https format.The connectivity pool defines the OpenAPI or WebUI advertized_ip setting. For more information, see CONNECTIVITY POOL.issuer and client_id of the newly created application. You need these values to configure the Ocient System.
SSO Parameters
These SSO parameters are configurable by using DDL statements.
After all parameters have been retrieved, a database administrator can execute a DDL SQL statement using this syntax.
SQL
SQL
- The user must be a database administrator (or have the “Security Administrator” role for the “system” database).
- The user must be connected to the database.
- Any String key or value can be placed between double quotations (e.g.,
default_groupOR"default_group"). - String values that contain characters other than
([a-zA-z] | [0-9] | '_')must be placed between double quotations (e.g.,this.is.a.complex-$tring⇒"this.is.a.complex-$tring"). - The
NULLvalue can be used to clear existing configurations ofLISTorMAPproperties (e.g.,user_claim_ids = NULL).
SQL
The OpenID Connect protocol requires TLS for communication between the end user, the database, and the OpenID Provider. A valid TLS key and certificate pair must be configured on the SQL Nodes, which behave as a server during the Authorization Code Flow.
Set Up Machine-To-Machine SSO Integration
You can use DDL SQL statements to add client credentials for SSO connection to individual databases or to a connectivity pool that operates across SQL Nodes. These steps set up SSO client credentials on a database, but can also apply to connectivity pools.1
Create an SSO protocol.Use the CREATE SSO INTEGRATION SQL statement to make an SSO integration protocol with your preferred configuration. This configuration must include these properties:
- The
enable_id_token_authenticationSSO property must be set totrue. - The
additional_audiencesSSO property must use the URL from the OIDC provider, similar to theissuervalue.
SQL
2
Assign the SSO protocol.Use the ALTER DATABASE SET SSO INTEGRATION SQL statement to integrate the SSO protocol into a database. For connectivity pools, use the ALTER CONNECTIVITY_POOL SET SSO INTEGRATION SQL statement.
SQL
3
Connect to your system.Use a JDBC connection string that includes the access token value
<access_token>. This string connects to the local host at port number 4050, uses the SSO protocol, and with the username id_token.Shell
Set Up Cross-Database SSO Integration
Set up authentication using SSO integration across databases. Identify the database that has SSO integration using theusername@database format, where username is the access or identifier token and database is the database for the SSO integration. Each SSO integration has a client identifier client_id. You must obtain the access token using the same client identifier used in the SSO integration for authentication.
When you authenticate using SSO integration as a user, the system assigns you to a group defined in the integration. Such users always have groups qualified with the SSO integration of the database. These groups have fully qualified names such as sso_users@system, where sso_users is the name of the group and system is the name of the database. You can use a fully qualified group name from any database. Without the @database qualification, the referenced group specifies the current database. To grant cross-database privileges to such groups, you must reference them using their fully qualified names. You can find a list of the groups the current user is a member of by using the CURRENT_GROUPS function.
To manage privileges and groups, use the GRANT, REVOKE, ALTER GROUP, and DROP GROUP SQL statements. For details about privileges, see Data Control Language (DCL) Statement Reference.
Requirements
- Configure the SSO integration in the source database.
- The SSO user must be a member of a group that has the USE privilege on the target database. If the SSO user is not a member of any groups, the default group for the SSO integration must have the USE privilege on the target database.
- The token (either an access or an identifier token) must be valid for the SSO integration in the source database.
1
Create a default group
sso_users.SQL
2
Create the SSO integration
test_sso in the source database using the CREATE SSO INTEGRATION SQL statement. Specify your issuer and client identifier for the issuer and client_id parameters.SQL
3
Set the SSO integration as the default for the database
source_db. This step is optional. To set up SSO integration for the system database, substitute source_db with system.SQL
4
Grant cross-database privileges to the target database
target_db for the default group sso_users.SQL
5
Connect to the target database Or, connect using the device flow by using the name of the source database
target_db at the local host with port number 4050 using the JDBC driver with an access token on the source database access_token@source_db. Specify a password token.Text
@source_db.Text
6
Verify your connection using these queries:Check the current user using the CURRENT_USER function.Check the current groups using the CURRENT_GROUPS function.Check the current database using the CURRENT_DATABASE function.View session information using the You can also retrieve information about the defined groups using the
SQL
SQL
SQL
sys.sessions system catalog table and the identifier of the current session by using the CURRENT_SESSION_ID function.SQL
sys.groups system catalog table.
JDBC Driver Properties
This table lists the JDBC connection properties that apply to SSO integration. For details, see CONNECT.
User Access Control and Workload Management with SSO
The database maintains an internal User Access Control model consisting of groups, roles, and service classes. The database relies on group or role membership to determine the privileges of a user or service class. The following integration properties allow administrators to grant SSO users membership to a Database group or role:- The
groups_claim_idsandroles_claim_idsproperties define the token claims that specify the Provider-defined groups or roles of the user. - The
groups_claim_mappingsandroles_claim_mappingsproperties define mappings between a Provider and Database groups or roles. - The
additional_scopesproperty should include any request scopes needed for the Provider to include the group or role claims in tokens it issues.
Because SSO users can map to multiple groups, when choosing which group to assign creator privileges, the system follows this criteria:
- Filter by authorization using only groups with CREATE privileges on the relevant schema or database.
- When multiple authorized groups exist at different levels, the system uses hierarchy precedence to ensure that privileges are assigned at the most specific scope. The enforced hierarchy is that schema-level group privileges take precedence over database-level group privileges.
- If multiple groups match at the same level, the system selects the group name by using alphabetical order.
analytics_team group (with CREATE privileges at the database level) and finance_schema_admins group (with CREATE privileges at the schema level), and creates a table in the finance schema, the system assigns creator privileges to finance_schema_admins.For details about privileges, see Data Control Language (DCL) Statement Reference."user_groups" when the application requests the "example_scope" scope. In this scenario, the administrator wants to associate the Provider Group "Example Provider Group" with the Database Role "example_database Analyst".
SQL
By default, the database grants all users membership to the “Public Role” of the database for the current connection. Unlike other default roles, you can grant additional privileges to the “Public Role”.
SQL
The user must have the ALTER privilege on all Ocient-defined groups or roles specified by
groups_claim_mappings, roles_claim_mappings, blocked_groups, and blocked_roles.User Claim Identifiers (IDs)
By default, audit trails, including but not limited to system-level log messages, identify users connecting using SSO by theemail claim of the ID Token. If the email claim is not present in the token, the identifier is iss and sub ID Token claims separated by ::, for example: "https://ocient.okta.com::00u5rslndgXm9Ey7y5d7".
To change the FQUN, alter the user_claim_ids SSO integration property.
For example, to change the FQUN to a combination of the first_name and last_name claim values, execute this SQL statement.
SQL
<first_name>::<last_name>::<email> format. (For example: John::Smith::jsmith@example.com)
Updating the
user_claim_ids property has no effect on users that are already connected to the database.System Catalog Tables
Properties that do not contain sensitive data can be viewed using thesys.oidc_integrations virtual table. In addition to the configurable properties, a database_id column is included in the schema.
To view the configuration for a specific database (if one exists), execute this SQL statement.
SQL
The user must be a database administrator to view the OpenID Connect properties.