

Ocient supports deployment in GCP for pilot or testing purposes, but this setup does not guarantee data durability. Stopping Compute Engine virtual machine (VM) instances can result in permanent data loss.
- Prepare GCP resources.
- Set up an initial instance.
- Create machine images from the initial instance.
- Launch other instances.
- Follow the standard Ocient installation procedure.
Example Configuration
The table below shows the recommended VM types for each node type.
Metadata and non-Ocient nodes use the n2-standard-X machine type, where X represents the number of Virtual Central Processing Units (vCPUs) for your workload.
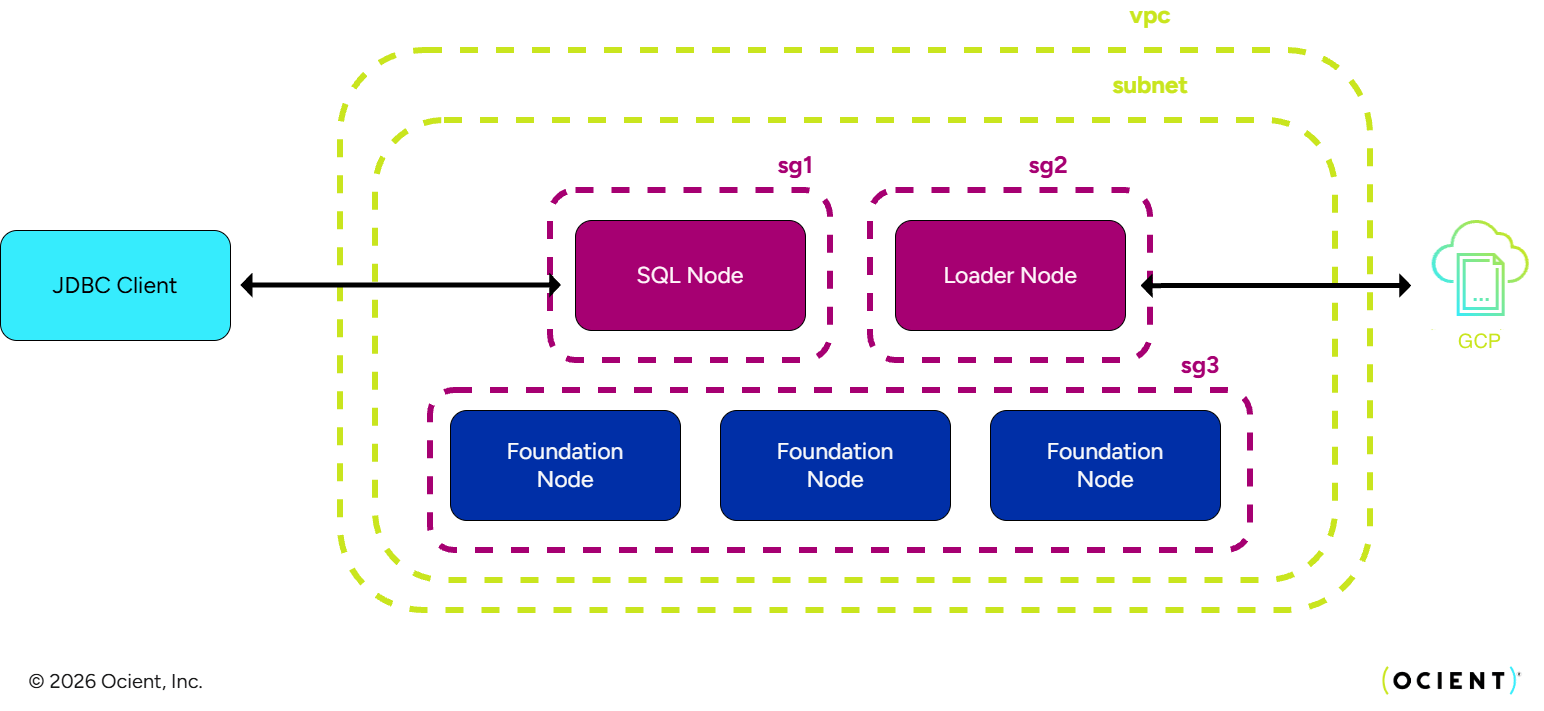
This diagram shows an example of an Ocient cluster in GCP. The system deploys the Compute Engine VMs (SQL, Loader, and Foundation) within a single subnet of a Virtual Private Cloud (VPC). GCP uses VPC firewall rules and network tags to control traffic to each node type.
Prepare GCP Resources
Create and configure these GCP resources:- The VPC network and subnets for the Ocient System. For details, see Create and manage VPC networks.
- VPC firewall rules with network tags to control access to the endpoints for each node type. For details about firewall configuration, see Create firewall rules and Add and remove network tags. For details about the network security configuration, see the Ocient Security Guide.
- Identity and Access Management (IAM) roles. For details, see Grant an IAM role.
If you are loading data from Cloud Storage, the Loader Nodes require IAM access to a Cloud Storage bucket. Assign the
roles/storage.objectViewer role (or roles/storage.objectAdmin if you also need write access) to the service account used by the Loader Node VMs.Node Setup (SQL Role) for the Initial Instance
1
Launch the Instance
Use this configuration for your machine image. Configuration steps differ depending on whether your setup uses a single-volume or multi-volume machine image. For details about creating instances, see Create and start a Compute Engine instance.VM TypeUse If you are using the Console, uncheck Turn on Secure Boot under Security > Shielded VM. For details, see Shielded VM.Firewall Rules and Network TagsCreate VPC firewall rules with network tags that enforce these rules:
Operating System (OS)
To set up the machine image, you can use any Ocient-supported OS (see Ocient System Requirements).Single-Volume Machine ImageIf you use a single-volume machine image, specify this configuration:- Increase the boot disk to 128GB or more.
- Increase the boot disk to 30GB or more.
- Increase the additional Persistent Disk volume to 100GB or more. For details, see Add a Persistent Disk to your VM.
This Persistent Disk volume supports key system directories in the image (
/home, /var, /var/log, /var/log/audit, /var/tmp).z3-highmem-88 for Ocient nodes. Use n2-standard-X for Metadata and non-Ocient nodes.Secure BootDisable Shielded VM secure boot when creating the instance. Use the --no-shielded-secure-boot flag with the gcloud command.Shell
- Allow SSH to the nodes.
- Allow communication internally between nodes.
- Allow access to SQL Node endpoints. For details, see the Ocient Security Guide.
2
Access the Shell
Connect to your instance using Secure Shell (SSH). For details, see Connect to Linux VMs using Google tools.
3
Extend Logical Volume Manager (LVM) Volumes (Multi-Volume Machine Image Only)
This step applies only to multi-volume machine images. If you are using a single-volume instance, skip this step.
/home and /var LVM volumes and their filesystems to fill up the expanded Persistent Disk volumes. These actions expand the LVM volume and the contained file system to accommodate the package, logging, and metadata of the Ocient System.These code examples show how to extend LVM volumes for a RHEL 9 image.Other machine image types might require different sizing. Contact Ocient support for the best sizing for your system for multi-volume instances.
Shell
- Add 66 percent of the available free space in
vg-01to thevar_vollogical volume. - Add all (100 percent) of the remaining free space in
vg-01to thehome_vollogical volume.
Shell
Shell
4
Update Packages
Update all your software packages to their latest versions and then reboot your instance.For RHEL-compatible systems, use this command.For Debian®-compatible systems, use this command.Reboot after the update.
Shell
Shell
Shell
5
Install GCP Kernel Modules
GCP Compute Engine VMs require additional kernel modules for full hardware support. Install the extra kernel modules package that matches your running kernel version.Reboot the node after the installation completes.
Shell
Shell
This step is required for GCP Compute Engine VMs. Without the extra kernel modules, certain hardware drivers and features might not function correctly.
6
Install the Ocient Package
Copy over the For Debian-compatible systems, use this command.
ocient RPM or DEB package and install it.For RHEL-compatible systems, use this command.Shell
Shell
7
Set Up Kernel Parameters
Use the Reboot the system for the parameters to take effect.Check that the local storage drive is attached to the On GCP, drives bound to the For examples of attaching drivers to the NVMe drives, see NVMe Drive Firmware Upgrade Process.
ockernelparams utility to set up kernel parameters automatically, including the huge pages configuration. Repeat this step on other nodes.Shell
Shell
uio or vfio driver after reboot (the Ocient package installs a service that runs on startup to perform this action).Shell
uio_pci_generic driver display without a device name. This behavior is expected for GCP NVMe drives.8
Configure the Firewall
If you are not using an OS-level firewall, skip this step.
- Allow all necessary ports and protocols between Ocient nodes by:
- Opening all TCP/UDP ports within the private network range (e.g.,
10.0.0.0/16), or allowing known Ocient ports.
- Opening all TCP/UDP ports within the private network range (e.g.,
- Allow external access where needed by:
- Enabling SSH access (port
22) from your administrator IP range. - Allowing client access to SQL endpoints (for example, port
13101or as specified in your setup). - Opening any additional ports required for monitoring or management tools.
- Enabling SSH access (port
In addition to OS-level firewall rules, ensure that your GCP VPC firewall rules and network tags are properly configured (see Prepare GCP Resources). Both layers must allow the required traffic for the Ocient System to function correctly.
Create the Machine Image
After your initial node is fully configured, you must replicate the setup process for the remaining nodes in your cluster. This action ensures consistency and allows for proper internal communication between nodes. For details about creating a machine image, see Create a machine image.Set Up Remaining Nodes to Launch the Remaining Instances
Go through this process for each of your remaining nodes.1
Set Up Parameters
Launch the remaining instances with these parameters. For details, see Create an instance from a machine image.
- Machine image — Use the machine image created in the Node Setup (SQL Role) for Initial Instance step.
- VM type — Use
z3-highmem-88for Ocient nodes. This VM type:- Provides sufficient memory and compute for high-performance Ocient workloads.
- Has high throughput and network bandwidth for internal cluster communication.
- Secure boot — Disable secure boot using the
--no-shielded-secure-bootflag. - VPC firewall rules — Ensure these rules are in place using network tags associated with the nodes:
- Allow SSH to the nodes.
- Allow internal communication between all Ocient nodes.
- Allow access to endpoints described in the Ocient Security Guide.
2
Access the Shell
Connect to your instance using SSH. For details, see Connect to Linux VMs using Google tools.
3
Set Up Kernel Parameters
Use the Reboot the system for the parameters to take effect.
ockernelparams utility to automatically set up kernel parameters, including the hugepages parameters.This example specifies a Foundation Node foundation. Use a different node type as necessary.Shell
Shell